
Baling Tips for Quality Hay
No matter their size and shape, making high-quality bales that preserve hay quality boils down to following a few guidelines.
By Tharran E. Gaines | Photos By Jamie Cole
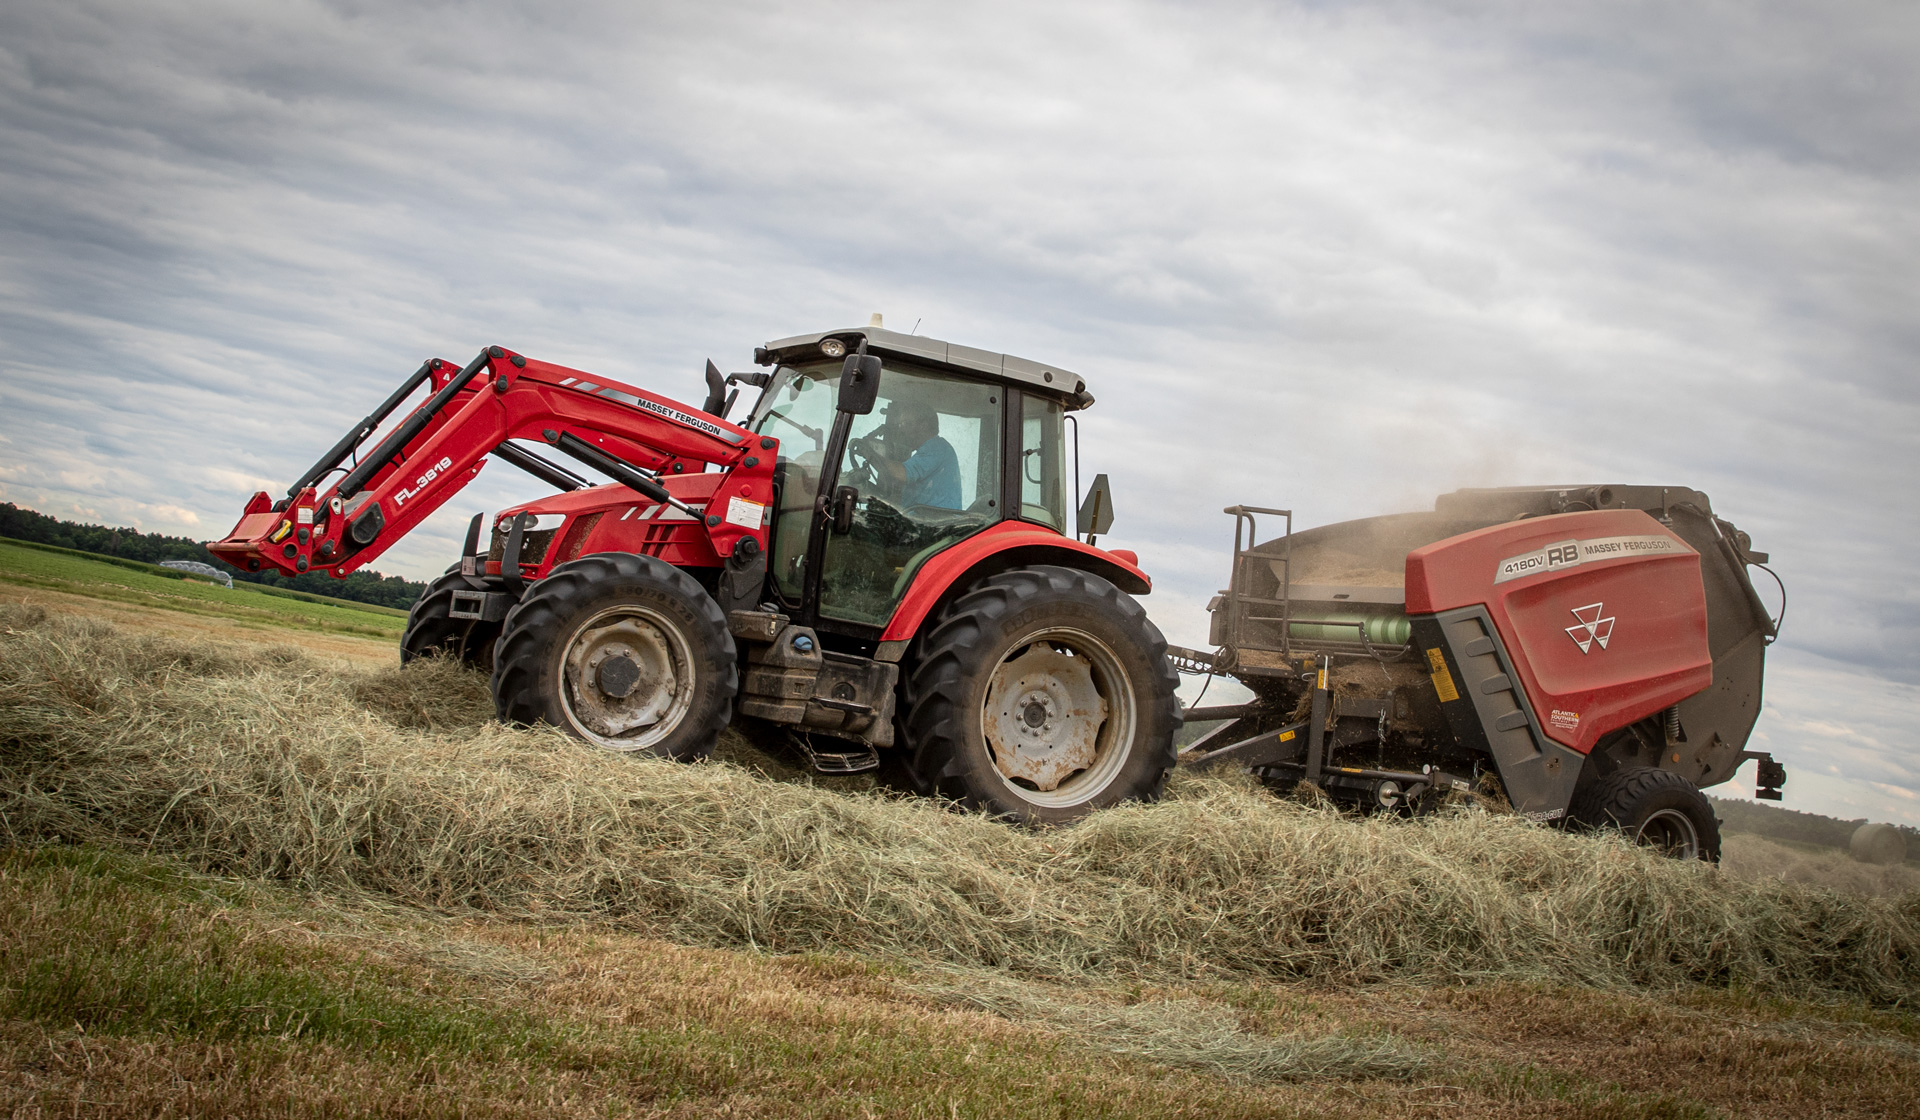
Bale quality begins in the windrow. This is particularly true with round balers. If possible, make the windrow as wide or slightly wider than the baler pickup. This allows the crop to feed evenly across the full width of the bale. If it’s not possible to make the windrow the same width as the pickup, make it less than half the pickup width so the operator can weave from one side to the other. Otherwise, the pickup will feed part of the crop into the center of the baler, which will result in a bale that is barrel-shaped or thicker in the middle than the ends.
Avoid baling when hay moisture is too low or too high to reduce leaf shatter and nutrient losses. “We chase moisture all the time,” says Reuben Wood, a custom baler who runs six Hesston® by Massey Ferguson 4690 small square balers and two MF2170 XD large square balers. In arid Arizona where Wood operates, chasing moisture means little sleep and good headlights. “Usually, it hits 15% between 3 and 5 a.m. We may work all day and have to leave for the next farm at 10 at night. That’s seven days a week.”
Lawrence Drost, who uses two MF2170 models to annually bale about 42,000 bales of irrigated alfalfa, wheat straw and cornstalks near Hartley, Texas, says he remotely checks a humidity meter at each pivot location before he even heads to the field. Then, when the air humidity gets to around 50 to 55%, he physically checks the hay moisture himself before calling in the baling crew.
Drost says he generally starts baling at about 13% at night when the dew comes on, and quits in the morning at about 11 or 12% as the dew goes off. “Sometimes we’ll add a little preservative with the HayBoss™ system right as we’re starting or right when we’re finishing, just to extend the window,” he says, noting that such an application allows baling high-quality hay in a wider moisture range.
“Quite often, I’ll also split a field,” Drost adds. “That’s particularly true when there is something like irrigated corn on one side of a pivot circle that holds in the humidity. By the time we finish one side, that side will usually have dried enough to bale it.”
Set the hay pickup height so the pickup follows the contour of the ground at or just above the tine height setting. If the tines aren’t digging into the dirt, the flotation setting is about right. Meanwhile, pickup flotation springs should be adjusted to where the load on the pickup wheel is at a minimum, but not allowing the pickup to bounce and leave crop in the field.
When necessary, set the pickup wheel lower to provide more clearance in rocky or uneven field conditions. Because of the abrasive nature of corn stubble and wheat straw, Ray Lynn Campbell, a custom baler from Maypearl, Texas, says he doesn’t run pickup teeth any lower than necessary. In fact, he says he usually drops the gauge wheels down when baling both wheat straw and stover to keep contact with residue to a minimum.
Match ground speed and power takeoff speed when baling with a round baler so the chamber is filled as quickly as the pickup allows. Keep the machine as full as possible at all times. The fewer times the bale rolls in the baler, the lower the amount of leaf loss.
Follow drive directional arrows on the baler monitor to make sure hay is fed consistently across the width of the bale chamber so bales have square shoulders. This is particularly important with round bales as it helps them shed moisture; but it also improves stacking attributes of square bales.
Monitor bale density. Even if your baler has a density gauge, it is still critical to get out of the cab and “thump” bales to verify that the density is high enough so bales hold their shape and provide maximum protection from the elements.
As Drost relates, “We try to get as dense of a bale as we can, but the drier the hay, the higher the pressure on the baler. So we try to find a happy medium when we’re baling.
“At the same time, we’ve learned to judge the moisture on kind of a three-way gauge. First, we go by the HayBoss monitor on the baler, which is almost dead on to any manual probe. Secondly, we go by the bale pressure; and third, since we added the scale package to one of the balers, we go by bale weight. We know the rough parameters of what a bale should weigh.”
Campbell, meanwhile, says he tries to get straw bales and corn stover bales as tight as possible. “If I kick one out and it pops the twine, I obviously back off on the pressure, but I try to keep it right on the edge.”
Keep up to date on regular maintenance. Campbell either trades balers every year or completely rebuilds his machine in the off-season to ensure peak performance. While some of the maintenance is done by Livingston Machinery Co., his Hesston by Massey Ferguson dealer in Chickasha, Okla., Campbell does much of the work himself, using only genuine AGCO parts.
“I’ve never used anything but replacement parts from the dealership,” says Campbell. “So I don’t have any experience with anything else.”
When assessing moisture before baling, consider whether it is stem moisture or moisture from dew.
The moisture present from dew will seep through the hay to some degree, while stem moisture will not. When the stem moisture is too high, spoilage can occur.
Observe moisture limits. When not using a hay preservative system, moisture should be no greater than 12 to 15% for large square bales; for round bales, no greater than 16 to 20%; and no greater than 18 to 20% for small square bales. Keep in mind that large square bales have greater density than other types of bales, hence the difference in allowable moisture.
Related Articles
Hay Seeds

Where does alfalfa seed come from? A small number of growers produce the tiny, finicky seed crop with patience and precision.
Read MoreA Start-Up Story: Making Hay with Matthew Hancock

The origin story of LM Hancock Farms proves that experience—not timing—is everything.
Read MoreA Farm Retreat From The ‘Real World’
State troopers are called upon to handle “just about anything,” says Chris Shrader, so having a farm to come home to is relief from a tough job.
Read MoreMaking Hay in the Music City

This horse boarder and hay grower has some unique urban farming challenges, but experience and equipment help him get the job done.
Read More
