
Looking Sharp: Create Your Own Customized Knife
Step-by-step instructions on how to make your own customized knife handle.
By Oscar H. Will | Photos By Karen K. Will
The indispensable utility knife is—without argument—the most useful implement when it comes to tooling around the farm. Whether you’re cutting baling twine or slicing an apple, a farmer without a knife is simply not equipped.
Making your own beautiful and functional knife from a few simple materials, some sourced from the farm, is easily achievable for the average do-it-yourselfer. To get started, you’ll need a full-tang blade blank (without bolster or finger guard), wood for your handle, some epoxy glue, and a handful of brass pins or rivets.
For this frontier-style camp knife with cutlery rivets, all materials—except the tools and handle material—were sourced from Jantz Supply.
Web Exclusive: Click to the end of the story or view full article for more knife-building resources.
Step1
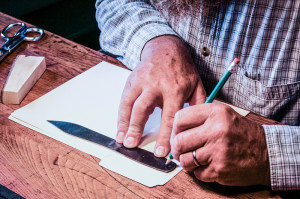
Step 1. Trace the knife’s tang (handle area of the steel) onto a piece of paper or light cardboard. Be sure to extend to the blade and mark where the sharpened area begins. Cut this out a little oversized and it will become the template for shaping the handle scales (halves of the handle that get riveted to each side of the tang). Be sure to trace any rivet holes carefully onto the template as well.

Step2
Step 2. The butt end of the template is shaped by the knife’s tang, but the blade end requires a bit of thought and care to get it symmetrical and pleasing to the eye. Using the three-rivet-hole tang I selected as an example, measure from the center of the hole nearest the butt end to the bottom of the handle. Use that measurement to mark the distance from the center of the topmost hole (the one adjacent to the blade) to where the top of the handle will be. Position the bottom of a glass or bottle against that mark—so the outside of the curve points to the blade—center it on the blade and trace. This defines the blade end of the template. Punch out the centers of the rivet holes you traced on the template.
Step3
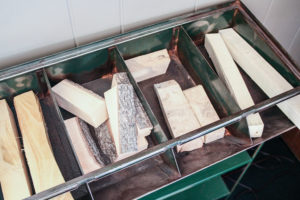
Step 3. Select your wood. Species such as black walnut, black locust and Osage orange make excellent handle material, but use what you have.

Step4
Step 4. Trace the outline of the template onto the wood, mark the holes, label the top, and cut the handle-scale-shaped piece out on a bandsaw. If you don’t have access to a bandsaw, use a coping saw, jigsaw or other handsaw with rasps to get the shape. Next, split the piece you cut out—again, preferably with the bandsaw—to create two identical scales, one for each side of the handle.
Step5
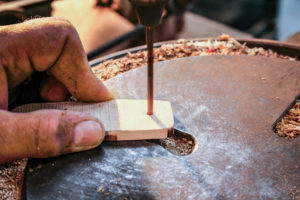
Step 5. Find a drill bit that matches the size of the holes in the tang of the knife and carefully drill a hole (at the mark) in one end of one handle scale. Using the bit or another pin to locate one end of the scale with respect to the hole in the knife tang, adjust the scale until it is aligned, and bore the other two holes. Repeat with the other scale. Find a drill bit the diameter of the head of your cutlery rivets, and very carefully use this drill bit to bore countersinks the depth of the rivet heads into the outer openings of all the holes. A drill press works best for this task.
Step6
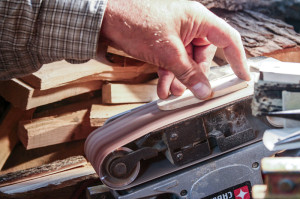
Step 6. Using a handheld sander, flatten the inside surfaces of the handle scales. Clamp the two halves together in the same orientation as the final assembly, and complete the shaping and sanding for the edges that will face the blade.

Step7
Step 7. Dry assemble your knife handle to be sure all the holes and parts are in alignment. Disassemble and scuff the tang area with sandpaper. Mix epoxy and apply liberally to the inside surface of one scale, insert the female half of the cutlery rivet through the scale and knife tang, and set it on your work area or bench. Apply epoxy to the inside surface of the other scale, install it over the female half of the rivets standing slightly proud of the tang. Insert the male rivet halves and drive them home with sharp hammer blows—a hard metal surface works best for this step—taking care not to spray epoxy. Wrap the handle with plastic wrap or wax paper, and clamp both ends and the middle. Allow the glue to set.

Step8
Step 8. Once the epoxy has hardened, unclamp and unwrap the handle, cover the blade with cardboard and/or blue painter’s tape, and go to work on the final shaping. Use a combination of rasps, files, power sanders and hand sanding to bring the handle contours flush with the edge of the tang. You can clamp the knife blade to the bench or in the vise (use wood blocks to avoid marring it) and hold the sanders. Round all corners until the knife feels good in your hand. Finish up with steel wool if you want a very smooth handle. Finally, apply several coats of Danish oil to the handle, and buff with very fine (#0000) steel wool in between coats. You’ll end up with a beautiful knife and the desire to make another.
Knife Making Suppliers
Jantz Supply www.knifemaking.com
USA Knifemaker Supply http://www.usaknifemaker.com/
Thompson’s Scandinavian Knife Supply http://www.thompsonsknives.com/
Ragnar’s Ragweed Forge https://www.ragweedforge.com/

